Cave rescue is a tricky area, but an important one. There is one inherent difference that puts it apart from rescue in most other activities. That is there is no easy access (usually) to the victim. In rock climbing, surfing, bushwalking, and about anything else, an ambulance, or failing that a helicopter, can evacuate you to the nearest hospital. But not caving.
Caving has the disadvantage of victims being difficult to access. They can, and usually do, take days. When you factor in the time it takes for the others not injured to get back to phone, then for the rescue team to assemble and get to the cave, and then get back to the injured person, you are already looking at nearly a day. Then you have to negotiate things like tight passages, pitches, squeezes, water, etc. You can see how it is so complex.
The world watched with bated breath in June 2018 when it took 17 days to get a group of 13 out of a Thai cave that had flooded suddenly. In 2015 a caver in New Zealand was injured by falling rocks which resulted in a broken pelvis, and the rescue took four days. A 2014 cave rescue in Germany took a staggering 11 days after a caver suffered a brain injury as a result of rockfall, and the rescue involved more than 700 people. In 1991 a caver had her leg broken by a falling rock in Lechuguilla Cave and the rescue took 91 hours. You get the point.
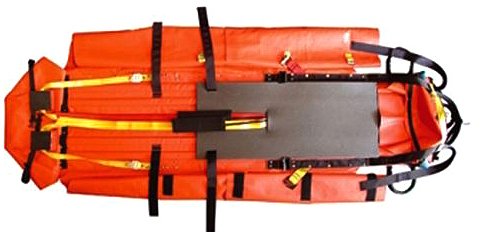
Cave Rescues in Victoria?
There have been a few serious rescues in Victoria. One occurred on December 8th, 1995 in Hades Cave in Buchan when student Jason Lau apparently was given bad directions and strayed off on his own just a few metres too far, falling approximately 10 metres and sustaining serious fractures. The rescue took 17 hours involving local VLCT cavers and other cavers from Melbourne. But it went smoothly and luckily the cave is not extensive compared to others in the area. There was some hype a the time about the caving filling up with water but I’m not sure how that is possible.
The curse of Labertouche!
There have been other 'rescues' of cavers becoming lost, especially in Labertouche Cave. Labertouche is an impossibly complex granite boulder cave, and even experienced cavers get lost there. The most recent rescue from Labertouche was in 2018 when the cavers knew what they were doing, and had the right equipment, but still spent a night in the cave. There have been quite a few others, and often the party is found within just a few minutes.
A minor rescue apparently occurred in Honeycomb Cave in Buchan many years ago, and the cavers were found 5 metres away (via a hard to see squeeze) from the bottom of the entrance pitch. They said they could hear birds chirping and that there was obvious debris from the surface, but they just couldn't find the squeeze.
Cave Rescue Victoria (Now deceased)
Cave Rescue Victoria existed for quite a few years, but its members dwindled and due to the fact that not much caving was going on, and the leaving of its participants, it died a slow death. For many years after that there was no formal cave rescue group in Victoria.
However, more recently, Cave Rescue Gippsland have formed, who cover Buchan and Labertouche amongst other places. The group are meeting regularly to practice their skills and have established a terrific network of cavers and other people who can help in a cave rescue situation. Some of the members are highly experienced local Buchan cavers, who I would definitely want, and trust, as first responders. Lets hope the group never see any real action, but it’s a comfort to know it’s there.
Caving, statistically, is very safe.
I don't want to scare you from caving. Serious rescues are VERY rare. Caving statistically is a very safe sport. In fact, the stats internationally indicate that the most common cause of death in caves is drowning, when cavers enter a cave in bad weather, or from exposure being hypothermic. See the menu on Statistics under the advanced caving menu. Some caves flood dramatically and quickly, whereas others flood gradually. Many caves in the United Kingdom flood badly, and there have been quite a few incidents. When I was living and caving over there, there were whole weekends when we had to stay on the surface due to heavy rain.
None of the Buchan caves, or any caves in Victoria are prone to immediate severe flooding, but some of them can flood given enough rain. A flood in Scrubby Creek would be serious as it would sump off the roof sniff, trapping you in the cave until the water level receded. Other stream caves in Buchan such as Trog Dip, M4, Duke’s Cave, Dalley’s Sinkhole, Sub Aqua, Wombat Walk, all respond to rain but a torrential ‘wall of water’ is unlikely in any of those. I recent hear for a squeeze filling up with water in Shades of Death cave during very heavy rain, which could’ve been a problem if there was a caver in the squeeze. But in all my time in Buchan I’ve never heard of a flood event putting someone’s life at risk.
The main danger - Water.
Some caves in Tasmania flood dramatically, and there have been deaths recorded. The rule of thumb is that if you find yourself in a rapidly flooding cave, just get as high up in the cave as you possible can and just stay there, for as long as it takes. Even if it is days! The deaths are often a caver who has decided the water has gone down enough and he should be fine. Eventually the water will recede, and the chances are you can hopefully exist on the water you brought and snacks, or even carefully get water out of the flooding streamway. You can survive a long time without food as long as you have water, so just be patient and wait.
And most importantly do your research. Does the cave flood? Talk to a local and find out. If so, what is the weather forecast today? There is no such thing as 'she'll be right.. I’m sure it won’t rain heavily'. If it is a floodable cave and rain is forecast, then just go and see a movie, or find a cliff to do some SRT practice in the rain. The cave will be there on a day with better weather, sometime in the future!
Cave rescue is an art form and a unique challenge. Let’s hope it doesn't get used too often.
Once you've honed your caving skills in somewhere easy like Buchan, and then perhaps done some interstate trips to Tassie and NSW, it will become time for you to step up to the most challenging but also the most rewarding type of caving: Expedition Caving.
The sharp end of caving, the hardest, with the biggest rewards.
This would be loosely defined as any caving trip that involves very remote locations, usually involving un-explored caves, huge logistical challenges, massive amounts of gear, and in general very thorough planning.
The VSA does one regular expedition a year, to the Nullabor. In previous years, VSA went to Pungalina which is in the Northern Territory, and Mt. Owen in New Zealand, but this has ceased. A major expedition involving VSA members goes to Bullita in the Northern Territory every year, and this area contains Australia's longest cave, with more cave found every single year.
The Nullabor
The Nullabor is one of the world’s largest limestone planes. So, the VSA do a 3 to 4 week trip, towing the components of an ultra-light plane in a trailer. Once they get there the plane is assembled, and it is used to fly at low altitude and mark any cave entrances that are visible from above. The plane flies in a sequential pattern so that nothing is missed. Then a ground crew goes and looks at every tagged feature one by one.
The caving is hit and miss. They have found big extensive and significant caves, but these are the minority. There are a lot of little blowholes, and surface features that are not accessible for whatever reason. Plus, there are a lot of a certain weed that punctures tyres instantly, so mending punctures is a necessity! The trip is laid back, and it is the older cavers who generally go each year, and it’s as much a social event as a caving expedition. The Nullabor is MASSIVE and mostly unexplored, and even after more than a dozen expeditions they've only seen something like 5% of the area.
Pungalina
The other previous VSA expedition is up to Pungalina in the Northern Territory. This area presents yet another unique challenge - 100% humidity and temperatures in the caves of 35 degrees or more, with no breeze to help cool you down. There are no caving suits or overalls in this place. The cavers are in shorts and tee shirts, and the trips into the caves, which are like ovens, are often cut short when team members (or the whole team!) get heat stroke. Again, some caves they find are little things, but they have had some amazing finds too. Good decoration has been found, although the caves are generally not deep.
On the other end of the scale you have expeditions like a recent one to Papua New Guinea, that one certain VSA member attended. This was in dense remote forest, using locals for information and assistance. Huge amounts of walking to get to camp spots, and all sorts of dodgy busses, trains, helicopters, and whatever is available to get as close to the caves as possible. There are bugs, snakes, rain, mud, mosquitoes, hot humid steamy weather, and every chance that nothing major will be found.
But when you get lucky, you really get lucky! This particular trip found significant virgin cave which was apparently spectacular. If you are fit, and a good caver, and the idea of highly planned and the challenge of logistics, then expedition caving may be for you.
Logistics - Often harder than the actual caving!
The main trouble for most people is getting the time - these trips usually take at least a month if you include travel. These trips normally take a year or so to organise, and to be on one you really need a personal reference from someone already involved, or someone that can tell the trip organisers that you are competent.
A big factor on these trips is you cannot call on cave rescue if there is a problem. Expedition Caving means that if there is an accident, it Is the people in your group that have to get you out. So planning is also needed on how to deal with incidents. In a deep European cave several years ago, which was miles from anywhere, a caver broke his leg, and was brought to the surface by only the dozen or so people on the trip.
The great thing about caves is that there are lots of them around the world. And the statistic (don't quote me on this, it’s what I heard) is that only 10% of the world’s caves have been explored. It is the last frontier where a human can stand in a spot knowing they are the first to ever see what lays ahead.
If you cave long enough you will naturally make contacts, and you will know when you are ready for expedition caving.
As you do more caving you will meet others, including interstate cavers, and you will gradually make contacts and networks. This is how you gain access to these expeditions, by hard work and time spent underground.
Expedition caving is as hardcore as it gets, especially if the caves are deep. It’s not for everyone. But perhaps it could be for you....?

There aren't that many caves in Buchan that you can walk into and out of, with no gear needed. Many of the caves, especially on the Potholes Reserve, have vertical sections that cannot be 'free climbed' (IE Climbed with no aid). A vertical section of cave is called a pitch. Once you've done the half a dozen or so caves that don't have any pitches, you will have to graduate to the next level up, and use a ladder to ascend and descend the pitch in the cave.
Ladders – it’s all about technique
In Buchan specifically there are another half a dozen or so frequently used caves that have an 'entrance pitch'. IE The start of the cave is straight down and cannot be free climbed. The caves I’m referring to include Honeycomb, Oolite, Baby Berger and Slocombe’s which are amongst some of the most frequently explored caves in the area. Once you are down the ladder to the bottom of the pitch the cave can then be explored horizontally. Some of these caves have further pitches further in, and some don't.
Caving ladders are quite unique. They are made of metal and are flexible, so they can be coiled up when not in use to fit in a pack and transported. The advantage of being metallic is that they are tough and unlike rope which can be worn away or even severed, they are bomb proof in any situation.
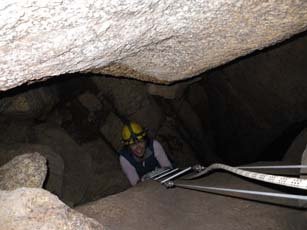
Sounds good? There is a hitch. Because they are not solid, it means they have the tendency to flail around if your technique is not good. The usual outcome is that the ladder swings out below you and you end up hanging on with just your arms. In that situation your arms will tire very quickly and you risk losing your grip.
To stop this happening the technique is to wrap your legs around the ladder, so your heals go into the ladder from the other side. This equalises your centre of gravity and means you can use the strength in your legs to climb up or down. More often than not, as long as you’re not the final caver ascending, you can get people to hold the bottom of the ladder to stop it from flailing, which helps tremendously, but this can't be guaranteed so you need to learn good laddering technique. Ladders can also be tough when they are against the rock, because it is then hard to get your fingers and feet behind the rungs.
Your first laddering should be a practice in the outdoors - If in Buchan, Wilson's Cliff is an ideal place.
Ladders in the old days (IE before the 70s) were used for all pitches, until single rope technique was developed. But they are still used today on pitches of less than about 10 metres. This is because for such a small pitch it is over-kill to rig ropes and carry or wear vertical caving equipment.
All ladder climbs should be belayed. This means you will wear a harness connected to a rope at the top of the pitch, let out (belayed) by another caver in case you slip and fall, get hit by a falling rock and lose consciousness, get too tired to keep holding on (which is almost always due to poor technique). If a harness is not available, then one can be made using tape. Or as a worst case just tie a bowline knot around your body under your arms. A fall with just a rope around you will hurt (and potentially crack ribs) but it will stop you from falling.
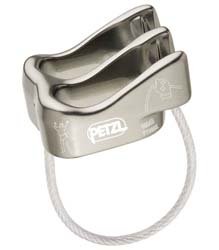
The caver at the top of the pitch will use a 'belay device' to catch your fall if you come off the ladder. Such devices include stitch plates, racks, or even just a knot called a munter hitch tied around a carabiner (although this is not ideal as it twists the rope), but is a perfectly good makeshift belay if nothing else is available.
Never do a ladder pitch without a belay on. Even if it is just a loop of rope around your waste.
On a short ladder of only perhaps 5 metres, often a belay is not used, but this is not good practice. Even a short fall of 5 metres can break bones or even kill you if you fall onto a sharp rock. So even on short ladder pitches a belay should always be used.
The trip leader would normally operate the belay, and he or she should have a way to self-belay when they descend the ladder after everyone else, or ascend the ladder before everyone else. Again, more often than not the leader has good technique and will just do the ladder with no belay, and that is their choice.
In caving you just can’t pick a rock, do a granny knot around it and hope for the best. Hopefully you have read the section on 'Rub Points' before this. Rigging Caves, both from the surface, and also once you are in the cave, really is an artform.
Rigging - The art of setting up ropes to get you in and out of a cave.
There are a set of knots that you need to know, which will be suitable for any situation you will ever encounter. These are: The Figure 8, The Alpine Butterfly, The Munter Hitch, The Bowline and the Double Fisherman’s. In particular, I would highlight the figure 8. In actual fact, you can use the figure 8 in 80% of situations, although the other knots have various characteristics that make them more suitable for different purposes or situations. Some people use figure 9's instead of figure 8's, but this is academic and is really only better if you take a fall on it. The figure 9 is also technically a stronger knot, but again the figure 8 is more than strong enough.
What do you tie the rope to?
The next part of rigging to mention is identifying what to rig off. If the pitch starts right at the surface, and is not bolted, then the first thing you would look for is a rock nearby that is large enough to safely hold a rope without it slipping off, or alternatively a nearby tree (although some conversationalists may disapprove of using a tree in case it is damaged - in which case you can use a cave pack or improvise a way of protecting the tree.
Bolts are a riggers best friend!
I mentioned bolts. In the United Kingdom the routes through their vertical caves are highly mapped out and bolted. It is great! You know exactly where to rig and it is simply doing a quick figure 8, into a crab, onto the bolt and there you go. However, in Victorian caves we have very few bolts, and probably 90% of the anchors we use are natural features. These would be rocks and trees on the surface, and things underground such as columns, jugs, rocks, threads, stalacmites, or anything strong that will take a rope. Obviously, we NEVER use any feature that is decorated. And decoration is not safe to rig off anyway, as it is not bedrock and is far weaker than solid limestone.
So, you know your knots, and with experience you learn how to spot good things to rig off. But as I've mentioned, the big no-no is rub points. And the best way of avoiding rub points is by picking a good anchor at the top. In the UK they take this to an extreme level, and will often use what’s called a 'Bolt-Traverse' to get to a spot so that there are no rub points and the rope hangs free all the way down. A bolt traverse is where you use your safety cords (called Cow’s Tails in Australia) to shuffle across a wall that has bolts every 2 or 3 feet. It can be very unnerving if there is nothing under you, which is usually the case.
The best rigging means positioning the rope carefully at the top, and taking time to achieve a free hanging rope all the way down.
If you can't rig a free hang rope then the rigger has to watch for rubs as they descend, and if a severe rub is found then the rigger must find somewhere to rig a re-belay or a deviation.
It’s important to note now that if you are only abseiling, and you don't have to prusik back up, rubs are less serious. It is the up and down sawing motion of ascending a rope that is dangerous. Also, if the rub is against a smooth surface it is less serious. Sharp jutting spiky bits of limestone are what you are looking for.
In America they use what we jokingly refer to as IRT - Indestructible Rope Technique. Over there (generally) instead of using light weight 10ml or 9ml rope, they use big tough 11ml rope, so that even if there is a rub point the rope is so thick the chances of it totally breaking are slim. They argue that the technical manoeuvres of SRT are more dangerous than the chance of a rub slicing your rope. Maybe. Maybe not.
Rigging rebelays and deviations is part of this art form. I won’t go into the details, but rigging these features requires some skill in making sure the lengths of rope are correct. Make the lengths too long and you risk a long fall if you make a mistake. Rig the ropes too short and they are too hard to get past. And finding anchors halfway down a pitch often needs some really creative thinking.
Rigging etiquette
The rule of thumb in SRT caving is that the rigger goes first, to try out their own rigging. And usually the most experienced other team member is the de-rigger. Some poor soul has to come up last and un-rig as they go, usually stuffing the rope into a bag as they ascend. This is of course only if the trip is not a pull through (this is when you pull the rope down after each pitch and exit at a different part of the cave - not often possible).
Buchan is slowly being bolted more, and there are a few caves there that have well placed useful bolts. The bolt just below the pitch head in Jam Pot is a good one. And the bolt in the deep pitch of Oolite is also a good one. Bolts installed at the pitch head of the route to Elk River made their trips much easier. Parks Victoria do like to be asked first though, as technically you are vandalising the cave if you bolt it without permission. And, generally it should only be the frequently done caves that deserve bolts. Remember when using bolts always have a good pull on them first to make sure they don't wiggle or come out, and inspect them for rust or decay. See the section on rub points for more information.
That is an introduction to the basic principles of rigging. It’s really something that comes with time. In a perfect world, every caver in the party knows how to rig. This means you can split the jobs up between the group and get it done quickly, and further to this, that each member will identify a mistake such as a carabiner gate not screwed up, etc.
Get your basic SRT skills going first, and once you are happy going up and down on rope, and doing rebelays, knot crossings, direction changes and deviations, then start learning how to rig.
Its yet another interesting challenge that caving has.
So, for some reason caving is thought of as an 'extreme' sport and that for some reason it is incredibly dangerous. This is far from the truth. Unfortunately, the author has been unable to find official Australian stats, but here are the stats on caving in America.
The US web site http://www.outsideonline.com/blog/outdoor-adventure/exploring-caving-accidents-deaths-and-rescues-in-the-united-states.html listed the following stats:
2,000,000: Estimated number of people who visit caves annually, the majority of them on low risk expeditions or on guided cave tours.
10,000: Members of the National Speleological Society, who are more likely involved in more rigorous expeditions.
1,356: Victims needing rescue over the 28-year study period, an average of roughly 50 people a year.
83: Percentage of the victims who were male.
54: Percentage of cavers rescued because they became lost or stranded. “While it is impossible to know for sure as the data isn't there, this was likely most often due to lack of experience,” says Fletcher.
446: Traumatic injuries reported.
74: Percentage of traumatic injuries caused by caver fall, the number one accident type. “With an often damp and dark environment it is easy to see how this could occur, especially once the caver gets tired—or cold, which would lead to decreased dexterity,” says Charlton. “Keeping well hydrated, fed and warm would help with physical and mental acuity and hopefully decrease the number of these errors.”
45: Cases of hypothermia.
81: Fatalities during the 28-year study period, an average of roughly three deaths a year.
24: Fatalities due to falls, which tied as the leading cause of death.
24: Fatalities due to drowning, including six boy scouts in one incident. “This was very heartbreaking and preventable had the rain been anticipated more,” says study co-author Dr. Alejandro Stella-Watts
Caving in the United Kingdom
In UK the majority of deaths are drowning and exposure/hypothermia, about a 3 to 1 ratio of drowning versus falling as cause of death. The UK also has a huge problem with cavers getting lost on the moors at night in the fog and getting lost, by far the majority of rescues are just a bunch of lost cavers disorientated in the featureless foggy black environment. The Welsh and Yorkshire karst areas are so barren and in Winter the sun sets very early, and getting lost is so easy.
Caving deaths in Australia?
There has only been one major dry caving disaster in Australia. This was in 1990 when two students and a teacher were washed away in Mystery Creek Cave, Ida Bay, in Tasmania, due to a rapid flooding. If you ever do Mystery Creek cave, near the exit look at the flood debris way up above you on the walls. It really floods! Tasmania, like the UK, needs respect in wet weather. I have heard (although not seen) that apparently Mystery Creek now has a flood rescue area where there is extra food and warm gear to put on, that local guides are all aware of.
What about cave diving?
Well - this site isn't about cave diving! But as there is a lot of cross over between caving and cave diving, I will entertain the question. For information, there have been 16 cave diving deaths in Mt. Gambier over the past 40ish years, although they went from 1969 to 2010 with no fatalities at all, until tragically three divers drowned within 2 years. There is no explanation why such an unblemished safety record suddenly went so wrong. See the Cave Diving menu for more information.
The fact that there are no Australian stats on caving accidents and fatalities is simply because we don't have them! There is the odd serious rescue, every couple of years, and some callouts for lost cavers, but no deaths. The most recent Australian cave rescue was in the Mt. Cripps area in Tasmania on the 11th of October 2020, when a caver fell several metres whilst ascending a ladder. The caver was conscious but badly injured and couldn’t get out of the cave himself, and the rescue was complete within about 24 hours.
Look at the menu on cave rescue for more information on cave rescues.
Well known NSW caver and cave diver Keir Vaughan-Taylor recently posted an extract onto the OzCavers email list with the following statistics:
sport Deaths per 100,000 activities ---------------------------------------------- Base jumping 43.16 Rebreathers 5.33 Sky Diving 0.99 Hang Gliding 0.86 Horse riding 0.57 Scuba Diving 0.50
I had to laugh it his conclusion - that ‘you should never base jump while using a rebreathe’r.
The stats came from SPUMS which is a diving and hyperbaric medicine journal. Issue Vol43 No2 June 2103.
So, what does all of the above say? CAVING IS SAFE!
You'll note that dry caving does not even make the list. And it’s no surprise that Base Jumping is massively ahead of all the other 'extreme' activities. Rebreathers are certainly an amazing tool, but in the authors personal opinion, they are generally prone to problems and if you believe these stats diving becomes ten times as dangerous if using a rebreather. Although it could be argued that those that are elite enough to be using breathers are probably also proficient enough to be doing exploratory, highly technical and deep dives which increase the danger in themselves as much as the use of the breather.
I have witnessed probably about 4 or 5 uncontrolled falls of more than a metre (one of which was me). The worst of these was about three metres. In none of these falls were there any serious injuries and in every case the caver walked away and finished the cave.
Anyway, I hope all of these stats say something about dry caving. It really is not a dangerous sport for the average recreational caver. Join a club, get trained by someone good, cave conservatively, familiarise yourself with the Australian Speleological Federation standards for caving safety, and have a blast!
Advanced – SRT & rope Work
So, we have covered the idea of ladders as a tool for accessing minor pitches of 10 metres or less. But what happens if it is 20 metres? Or 50? or 603 metres (The world’s deepest underground pitch is 603 m in Vrtoglavica Cave, Slovenia).
The answer is SRT - Single Rope Technique (often referred to as vertical caving). Put simply, this is a way of descending and ascending pitches using only 1 rope with no need for another belay.
Before reading onwards, take a quick look at http://en.wikipedia.org/wiki/Single_Rope_Technique
Descending
This is done by abseiling, in the same manner as many rock climbers do, and many commercial outdoor rec companies do things like Adventure Guides Australia’s huge 200m abseils at Mt. Buffalo, etc. So, it is not specific to Caving. The first ever abseiling was done by putting a rope around your body and hoping for the best (often with a belay). This was until mechanical descenders and ascenders were invented, which happened roughly at the end of the second world war, although modern day SRT was developed long after that.
Descenders
There are a number of tools you can use to abseil. The simplest three are a bobbin, a stitch plate (which can also be used to belay climbers on ladders), or you can even abseil on a munter hitch knot tied around a carabiner (twists the hell out of the rope). A lot of people in caving do use a bobbin, often a Petzl ‘Simple’.
However, most cavers in Victoria (and probably the world) use a STOP descender. This is like a bobbin but it has an auto break feature, so if you let go of the handle you stop. This has several advantages.
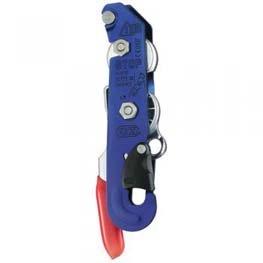
One is that if you become unconscious for any reason you won't plummet to the ground. More importantly though is that when you are on rope there are occasions when you need to do 'technical manoeuvres" on rope (see the menu on 'technical SRT'). When doing these technical manoeuvres having a stop that you can let go of without having to do a lock off is handy. In simple terms, it is comforting and convenient that if you need to you can just forget your descender.
All sorts of things can go temporarily wrong with SRT, almost all of which are fixable given you stay calm and think logically about how to rectify the situation, but a stopping descender takes one worry out of the equation. The proper etiquette is that you still do a hard lock off on a stop, but in reality if you don't have time to do that, or you forget, it won't matter.
The next most popular descender is a 'rack' (known in certain places as a 'rappel rack'). Racks are particularly popular in North America. They do not have an auto break, so if you let go of the rope in your right hand you will descend very quickly (although not as quickly as a free fall). But they do have some major advantages.
Firstly, you can pretty much go as fast as you want. Stop descenders get very hot if you abseil quickly, and can burn through rope if you go to fast, but racks have better heat dissipation. Also, the ride on a rack is smooth, not jerky like on a stop, particularly on stiff or thick rope. And thirdly on a rack you have more control on the amount of friction being used. So, if you are a beginner or a bit nervous you can add friction, or if you want to go really quick down the pitch and are an experienced caver you can have very little friction.
Ascending - a little more tricky
This is where it gets a little more complex, and it’s hard to know how or where to start the explanation. The common misconception is that it is easy to just climb up a rope arm over arm. I guarantee you that you wouldn't even make it up 10 metres doing this, and would slowly weaken until you were not able to climb any further.
So - you need a way to ascend on a single rope, under your own power, with the facility to take a break when tired, the ability to have two attachments to the rope for safety, and the reliability not to fail in any conditions (i.e. even when wet or muddy).
The prusik knot
Many years ago, the prusik knot was invented. This was a knot that when tied around a rope would grip it, so that you could slide the knot up but not down. Also known as a prusik loop. Cavers quickly realised that this was far better for ascending deep pitches than ladders. It was not long before the first mechanical versions of ascenders were invented. In fact, there is evidence to suggest that the first mechanical ascenders were used in the mid 1930's. But by the 1970's they had become commonplace. These ascenders, like the knot I described, allow the device to slide up but not down.
What all SRT ascending techniques have in common is they use these ascending devices. However, there are quite a few variations on the details. Some attach ascenders to the feet. Some have three ascenders working instead of 2. But the most common in Victoria, is the frog system.
The Frog Technique - The world's most commonly used ascending method.
Put simply, the frog system relies on two ascenders. One is held in your hand (usually connected to your harness/central maillon). This hand ascender has attached to it a length of rope or tape connected to a loop that you step into. The other ascender is attached to your chest. The concept is simple -
1) Raise your hand with the ascender. As you do this, the foot loop a metre or so down will also ascend.
2) You stand into the foot loop which ideally means your leg goes from a 90 degree bend to being straight, giving you about a foot of lift.
3) As you stand using the foot loop, the rope runs through your chest ascender on its own.
4) You can then relax, and as you do so your weight Is taken by the chest ascender, and the foot loops and hand ascender whilst still being attached to the rope, are not taking any of your weight.
5) Repeat the above process - STAND, RAISE, SIT, STAND, RAISE, SIT, STAND, RAISE, SIT. Etc. until you are at the top of the pitch.
There are many subtle variations on this technique, but it’s all based on the same principles of 'biting' the rope to slide up but not down.
So that is how to ascend and descend a rope, with no help from anyone else, safely, efficiently and quickly. The nice thing about SRT is that you can take your time, and when tired you can just let go of the rope and float around for a bit until you get your breath and then keep going. The other crucial advantage of this is that it is almost all leg power, not arms, so you have a lot more stamina.
This process of ascending is called 'Prusiking'. It is FAR easier and more efficient than laddering. But there is one major problem: Rub Points! See the next menu item to find out what rub points are all about.
There is more detail on the 'Rub Points' page. But I will say now that once you've done enough horizontal caving and you are ready to get vertical, take it seriously. You need your gear to be set up for your height, arm length, your weight around your waste and around your thighs, etc.
Practice lots.
Ideally, you need to be intimately familiar with your SRT. So much so you can put it on and be ready to go within a minute or two. And even more so, that you can do it in the dark, or wet, or in cramped conditions. You have to remember you have other cavers waiting for you at the bottom and/or top, and they may be wet or cold. Having said that, fast is NOT necessarily going nuts and wearing yourself out in 10 seconds - fast is having good steady smooth and efficient technique.
The efficiency of you ascending means how much rope you pass through you with each 'step' up you do on the frog system. If you are a 6-foot-tall male, getting as much as 2 feet of ascension per prussik is pretty good. Shorter people will get less. And if your gear is not configured correctly you will lose efficiency.
So, know your gear. Play with it. Put it on and off. When you're caving with it give it a thorough inspection before every trip. (And also check your ropes regularly too!).
Falling on a rope
A fall on rope in any situation is more serious the less rope is above you, simply because there is less stretch to absorb the fall. We use static ropes in caving, which are ropes with less stretch, as falling onto them is a very rare event (I've only seen it happen a couple of times). The less stretch is because that when the pitch is any longer than about 15-20 metres you start to get bounce in the rope. On a long pitch of 50m or more you are bobbing all over the place, and potentially sawing gradually through a rub somewhere. Climbers use dynamic rope that has lots of stretch as they often take falls. This is another reason we use figure 8 or figure 9 knots as they absorb some of the potential fall. If a rope takes a fall, it should ideally be thrown out. Also beware of any SRT gear that is dropped onto rock or solid surface. If it has fallen more than a metre or so, technically it should also be thrown out as it can develop hairline fractures and weaknesses. This mainly refers to carabiners and maillons. Your whole SRT kit should be replaced regularly, I’d say every 5 years with moderate use.
A practice I have adopted is that now every time I take off my gear I dis-assemble all the parts. And when I put it back on I put all the parts back on one by one. This means I know for a fact that everything is done up and in its right place and I notice any problems. Most people leave the kit all done up so all they do is quickly slip it on and do up the central maillon. This is fine, although it’s annoying when it gets tangled, which happens easily when its dark, you are wet and tired etc. As long as you are quick enough in assembling it all every pitch you do then its fine.
I have had a million different SRT rigs shown to me and justified as to why they are the safest, easiest, fastest, etc. To be honest, I think that ultimately it is how you use the rig which determines the safety and efficiency. Particularly your two safety ropes (cow’s tails). These things are your life! Alpine cavers (Europe) only use two, to save weight, but in Australia we don't have any caves (Even in Tasmania) where we are trying to save weight that seriously, so I choose to use three.
The bible of SRT - 'Vertical' by Al Warild
If I haven't already mentioned it somewhere in this site, when you feel ready to start SRT, order a copy of 'Vertical' by Al Warild. Or it is also viewable for free at http://www.cavediggers.com. He is Australia's 'best' caver (if you judge best by he's bottomed the world’s deepest cave and written a book and has been on some insane expedition caving. 'Vertical' is the bible of SRT and it is not overly technical, easy to read, cheap, and he is an Aussie! There is nothing in Vertical that is missing. Whilst real training on a cliff with an instructor is probably more useful, reading the book will help your skills immensely.
In terms of Victoria, if you include the caves on public caving reserves, and the caves on private property that we have access to, and the permit caves on Parks land (so we are talking probably 200 caves or more) I'd say more than 50% have a pitch inside that needs SRT. Sometimes it’s at the entrance, sometimes deep inside, sometimes massive and sometimes very snug. But there’s lots of them. In fact, in Buchan, there are only about 10 easily accessible and extensive public caves where NO gear is needed at all. If you count ladder caves as those as needing gear then it’s more like 75% needing gear of some kind.
To be a caver in Buchan, you will run out of caves quickly unless you learn SRT.
So, to be a caver in Victoria you do really need vertical skills eventually. Quite a lot can be done on ladders if you don't mind them, but most cavers don't like them at all, and when you first do one you'll understand why. They take more strength to ascend, they flail and wobble around, resting is (possible) but harder than on SRT, and when they are against a wall which is more than half the time it’s a pain to get your hands and feet into the rungs. As I've said in the laddering section, they are all about technique. The VLCT Caving Club are well known for using ladders a lot and are happy having developed excellent laddering technique and use of belays, but most of the active cavers will use SRT on anything over 10 metres. The only other advantage, again as I've stated, is that rub points aren't an issue on a metal ladder. I caved for about a year before starting SRT. In Buchan learning SRT opens up dozens and dozens more caves for you to explore.
Think about the cave environment. It is full of razor-sharp rocks and calcite deposits that can saw through your rope in minutes. The action of ascending on a rope is literally like a serrated saw going back and forth, and I have seen rope getting cut all the way through in only a few minutes of sawing, when done deliberately on the surface. These sharp bits of cave eating your rope are called rub points.
So, the aim of SRT is to avoid rub points, protect your rope, and your life.
There are a number of ways of avoiding rub points:
1 - A good free hang from the very top that is placed precisely right, so it doesn't rub anywhere the whole way down.
Most simply, rig your rope from the top of the pitch very carefully. Often if you take your time and try a few different spots, you can find a place to put your rope so that there are no rubs. A good way of trying this is to drop a rock down beside your rope, and listen as to whether the rock hits things and bounces around on the way down. In the UK they go to great lengths to get a good free hang from the top, and this usually involves traversing or acrobatic manoeuvres to get to the drop, which while great once you are on the rope, can be scary and sometimes difficult to get to.
2 - A deviation (also known as a re-direct)
This is where you use a bit of tape to alter the path of the rope. So, perhaps halfway down the pitch there is a sharp rub but above it there is a stalactite. You would tie some tape around the stalactite, put carabiner at the end, and the rope you are ascending/descending through the carabiner. This simply moves the rope away from the rub point. Deviations are usually pretty easy to pass. You don't have to fiddle with you gear, you just have to be careful not to accidently drop the tape that is holding the rope, as it can be hard to reach again. And also remember that they are not load bearing, so never hang off it, which is a mistake a beginner can make if they think it is a rebelay (see next paragraph).
3 - A rebelay
The third, and most commonly used, and safest, is called a rebelay. This is where you actually re-anchor the rope at some point during the pitch, to avoid a rub above or below. The difference here is that you have to rig your rope to stop and start at a certain point, which could be a bolt in a frequently done pitch, or could be a natural feature such as a stalacmite. For all intents and purposes, rebelays are the start of another pitch.
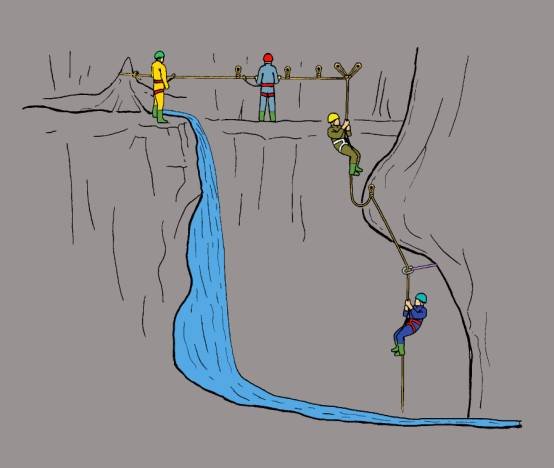
NOTE: I have not been able to find the author of the above image. If you know him or her please let me know so I can ask permission to use the image. The image was found on google pictures. It shows perfectly what rub points are all about, and what I have described. You never rig a pitch in a waterfall as even the fittest of cavers will get very cold, and when you get very cold your strength goes and you can get stuck.
Explanation of the above diagram from left to right
1) So - starting at the left. The first caver is waiting at the pitch head, clipped into a safety line, observing. It’s important for every caver to observe the one in front for safety (reminding him/her of anything they've done wrong, or any signs that there is a rub or other hazard unseen by the other cavers).
2)The second caver is doing a 'bolt traverse' along the wall of the cave, using his 'cow’s tails' (safety lines) to go from bolt to bolt. Sometimes you can stand, others you are hanging in space leaning backwards. This gets him away from the water.
3) The third caver has done the traverse and attached onto the downwards rope (which is a Y-Hang, meaning the rope has 2 anchors, each taking 50% of the load, for extra safety) - as this is the start of the vertical part of the pitch it is common, and he is abseiling down.
4) The fourth caver has crossed the rebelay, which is there to protect the rope from rubbing on the big rocky bulge on the right wall, and then abseiled further and also crossed a deviation which was probably there to get more distance from the water (if it was a lake or whatever). You can see that once the caver has crossed that rebelay there is then no load on the rope that is resting on the bulge. If that bulge was VERY smooth and not as large some cavers would risk it and just let it rub gradually, but generally you will find even a smooth looking surface has rock details that will damage a rope.
But how do you get all your gear past a knot, or a rebelay, or a deviation, without taking it off and putting it back on?
The challenge here is that you have to get your descending or ascending gear past the rebelay, bolt traverse, deviation, knot crossing, etc safely. I won't go into how this is done, but it is basically a set of fairly common-sense steps that aren't usually too hard. This is something you learn on the surface and generally have plenty of training days on a cliff somewhere before doing any SRT underground.
So why use rebelays?
A huge advantage of re-belays is that on the way back up multiple people can be on the same pitch at once, as long as they are separated by re-belays and separate anchors. You can see this in the image above - there are 3 cavers all on the rope at different stages, all independent, not impacting in any way on the others. As long as you are able to tell the caver above or below you that you're on the next section of rope, it speeds things up a lot. (IE you need to be within shouting distance, with no running water nearby which chews up sound) - it has been known for cavers to use whistles. Radios do not really work in caves (apart from highly elaborate 'hay' rescue phones, rare).
Also - every re-belay is another attachment to the cave which adds safety. If a re-belay fails due to choosing a bad anchor or a bolt popping out of the wall it doesn't matter as the re-belay above you, or the anchors at the top of the pitch, will arrest your fall. You will fall a few metres, but it will catch you and you'll be alive and well.
Other 'technical' SRT manoeuvres
Other technical manoeuvres include knot crossings, bolt traverses, pull throughs, changing direction, down prusiking, not to mention the person who rigs all this stuff. Rigging SRT is not always easy and should only be undertaken by someone with extensive experience and knowledge of SRT.
When I was learning, I actually had my SRT kit in the lounge room and I'd put it on and off and play with it while watching TV. I rigged a rope off a tree in the back yard and would get on rope regularly.
Technical SRT caving gets tough at times. The above is not even the start of it. Plus, usually you are alone with nobody to coach you when you are actually in a real cave in a real situation. It gets very complex very quickly, a lot can go wrong, and is not to be taken lightly. However, in almost all situations, if you get stuck, you should just calm down, think about it logically, and you can normally figure out how to rectify the situation with the tools you have.
Take it easy, learn from a pro, practice lots, get your own SRT rig perfectly measured for your body, and once you've got it, do it regularly so you don't forget!
When you are training in the outdoors you will make plenty of mistakes, but on each mistake, you will figure out the solution on your own with guidance of the instructor. As long as the pitch is rigged correctly, and your SRT gear your wearing is all calibrated for your height and weight, there should not really be any situation that you cannot somehow get out of. Probably the worst, just FYI, is when you jam your hand ascender right up to the knot at the top of a pitch or rebelay. Getting an ascender of a rope requires just an inch or so of rope above it for it to come free, because the movement of the rope lets it come off. Every caver I know has done it at least once, and you won’t do it again.
Master SRT before thinking about rigging. Walk before you can fly!
In Europe, they use what’s known as 'Alpine' style rigging. This means ULTRA light weight caving, due to the extreme depths they go to, they shred every single gram of weight possible. So, they use very thin rope that would rub through quickly, but they use rebelays all over the place so that its safe and so that multiple cavers can work at once.
In Australia we worry less about rub points, but we rebelay when it is obviously needed. The trouble is that in Victoria there are only perhaps a dozen or so permanent bolts. So quite often, as long as it doesn't damage the cave, we rig rebelays and deviations off natural features such as boulders or columns. Caves such as Elk River that get lots of traffic (especially Elk River as tanks are hauled up and down) they have bolted the pitch.
What was that about bolting?
Parks Victoria consider bolting as damaging to the cave and only permissible if the traffic warrants it, and that it adds safety to the cave that would otherwise put cavers at risk. Bolting must be applied to Parks Victoria formally through your caving club. Bolts can be installed fairly quickly, in maybe 10 minutes if you are fast and strong, using a handheld drill and hammer. The bolts in Tasmania and UK/EUROPE are brilliant because they are so well crafted and are always in the perfect spot to eradicate rubs further down. And you always know where to rig if you don't know the cave very well. Tassie is bolted mainly to protect formation, not the amount of traffic.
The VSA run SRT training days several times a year, for members, usually at Werribee Gorge or Whipstick Gulley in Warrandyte. The club has several sets of SRT gear for loan which you can use if you just want a taste, but can only be used in training environments.
I struggled with SRT - And still don't necessarily enjoy it.
SRT did not come naturally to me. It took me a year or so of practice, first outdoors, and then in caves, before I felt comfortable on rope. And even now after doing hundreds of pitches in caves all over the place, I still get nervous on the first pitch head. Once I'm on rope and my STOP takes my weight, I give it a gentle squeeze which drops me a few inches - then I'm ready to go. Note - until that point, I am still connected to the safety by my long cows tail.
To me personally, SRT is just a tool to get me into horizontal cave systems. Some people find the horizontal bits boring and just like to do deeper and deeper and more and more technical caves. Everyone is different.
SRT, Rigging, Ropework and Technical caving takes years to really become an 'expert' ... and in the Australian mainland we don't have many caves that require absolute expertise.
There are some caves in Tasmania that are nearly 400m deep, which is a significant depth, but still not a fraction of the deep caves in Europe that are over 1500m deep (or the deepest at 2.3kms). And in Buchan specifically, the deepest single pitch is about 40m in Baby Berger Cave. There are many other vertical caves in Buchan with various size pitches, some of which are technical, and others a straight up and down.